The most ignored component of any pair of headphones, headphone wires are also among the most delicate. They frequently sustain damage first as a result. The outside rubber insulation of the wires thins and weakens with each pull, twist, and spin. Your headphone wires eventually grow increasingly exposed, which leads to fraying or complete tearing off. If you handle your headphone cables properly, they might still break or even worse. Now the real thing to worry about is how do you fix headphone wires.
Be at ease! You don’t need to discard broken headphones as we are here to answer your question, “how do you fix headphone wires?”.
Inexpensive and simple solutions for frayed headphone wire.

1. ELECTRIC TAPE
Electrical tape is commonly found in homes, and it is also easily available at any hardware shop. Insulating electrical cables is what electrical tape is intended to do. You can try utilizing electrical tape for a quick and simple headphone wire repair since it is specifically designed for low-voltage electrical wires.
- Check to see that your headphone cables are spotless and free of any oil residue. As a result, the electrical tape will adhere to the wire more firmly and for longer. You can accomplish this by wiping the area down with a clean cloth and a tiny bit of isopropyl alcohol.
- The sizes of electrical tapes range. Before wrapping the wire with electrical tape, trim the tape to the necessary size in advance.
As tightly as you can, wrap the wire in electrical tape. This will insulate the wire and prevent future fraying or getting your headset wire broken.
2. HEAT SHRINK TUBE
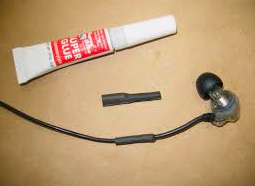
For a more robust and long-lasting solution, you may also try using heat-shrinkable tubing or sleeves. The main applications for the tubing are strengthening, insulation, and mending of frayed electrical lines, making them the perfect headphone wire repair solution.
- For a snug, secure fit, pick a heat-shrink tubing that precisely fits the cable size of your headphones. These tubing can shrink from half to a sixth of their initial diameter when heated, depending on their material and composition.
- Make careful to clean out any extra dirt or grease from your headphone cords. Wipe the area with a clean cloth and a small bit of isopropyl alcohol.
- Ensure that the tubing is placed directly over the frayed wires on the headphones. Make sure to wrap the wrap-around heat-shrink material as tightly as you can for a more compact finish.
- The heat-shrink tubing kit’s built-in heater, a hot air cannon, or a lighter are all options for heating the space.
- Avoid overheating it since it may melt or catch fire. To hold the tubing in place, use pliers or another tool; hot air pistols and lighters can cause finger burns.
Having broken or frayed cables might be the reason for sound leakage. To learn more, read, What is Headphone Sound Leakage and How to Fix it?
3. Cable savers
Try the cable savers if you’re not much of a do-it-yourselfer and need a quick fix. The major purpose of these is to stop cables from fraying. However, you can still use them on frayed headphone wire to lend support and backing to your headphone cables.
- Different sizes are available for these cable savers. Find the size that best fits the cords on your headphones.
- The area where the wire on your headphones starts to the fray is where you should wrap the cable saver.
- To ensure that the cable saver remains firmly in place, wrap it all the way around the wire (where the headphones’ cord meets the plug).
Note: These cable savers only work for round cables.You should also read How to Fix: One Earbud Not Working if you use earbuds instead of headphones.
4. Moldable glue
Silicone rubber is used to make moldable sticky putty. For DIY crafts, mounting requirements, electrical repairs, etc., you can utilize this. It can be molded, is elastic, strong, waterproof, and has outstanding insulating qualities.
- Isopropyl alcohol can be used to clean the region around the wire of any extra dust, dirt, or oil. A little isopropyl alcohol should be placed on a clean towel. Dry the area after wiping it.
- Moldable glue is similar to play dough. It is flexible and squishy. You can use your hands to roll the material in your fingers and shape it around the wire. Before the glue hardens, you have roughly 30 minutes to shape and rearrange it as you like.
- To set the glue permanently, it is necessary to keep it at room temperature for almost 24 hours.

This is an effective way on how to fix earphones wire.
5. Soldering method
You can put off the repairs to a professional who is certain to know how to mend them effectively if your headphones are still covered by warranty, and the damage is covered. If you have any doubts about your DIY abilities, this will help you avoid unforeseen accidents.
It’s advisable to acquire a new pair of headphones entirely to avoid harming other devices you use them with if you choose to DIY your headphones and end up not completely repairing the issue or making it worse.

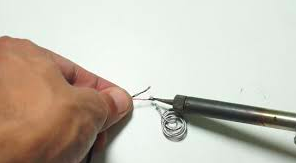
If you want to know how do you fix headphone wires professionally (which we advise you not to do until you are confident enough about equipment), you can use the soldering method.
- To see the wires within, remove the insulation.
Use a knife or cutter to carefully separate any two wires that appear to be tangled together. - Run a wire stripper slowly through the outside shielding to remove it.
- Cutaway until you come upon a damaged wire that needs to be fixed.
- There may be multi-colored wires visible in the headphone cable’s inner layer. The single bare, uninsulated wire is the ground wire, and the colored wires often convey sound.
- Cut the headphone wire if the internal wires are frayed, and threads are visible. Do this to make them more standardized and manageable.
- Sand the thin enamel coating off of each wire, including the ground wire, before soldering once the copper is visible, sand away. If sandpaper is not available, you can burn it off with a soldering iron or a lighter.
- Solder the connectors after twisting the wires together. Put a thin layer of solder over the wires by melting it with your soldering iron. Allow the wires and solder to completely cool and solidify.
- Wrap each wire in electrical tape to prevent them from touching one another and prevent any potential short-circuit situations after the internal wires have totally cooled.
- Carefully wrap your headphone wire in the heat-shrink sleeve, then heat it to shrink it. Your recently repaired headphone cable will be shielded and protected by this sleeve. If heat-shrink tubing is not available, another option is to wrap the wires with electrical tape.
If you find your headset wire broken and have a technical mind, soldering is an effective way to fix your wire.
Conclusion
With the methods above, you can find out how to fix earphones wire. This article provides you with an easy-to-follow guide and teaches you how to fix your broken or frayed headphones. The next time you have broken wires and somebody asks if can headphones wires are repaired, you can say YES!
On the topic of fixing, read Why Are My Airpods So Quiet and How Do I Fix It? The article can be useful if you are an Airpods user.

